Friday, November 28, 2008

Dotted Bag

One nice thing about times being a little lean, is that you're given the chance to make gifts for friends and family, and really focus on making them well. I made this handy tote for my sister's birthday a few days ago. I was actually able to make it without having to purchase a thing, and I was really happy with how well it turned out.

I used some old painting canvas I'd had around for years as a liner, to make it really sturdy. The outside is a linen-like fabric, and I used a heat and bond film to applique the three dots. Easy peasy. Like always, the hardest part was wrapping my brain around sewing the lining to the outside and turning it inside out... Which I actually gave up on and just turned the seam allowances in to face each other and just sewed it all from the outside. Phew, much easier on the noodle, and looks just as good.

Bottling Day!

Time to bottle finally arrived this past Wednesday, so I spent a few hours sanitizing our bottles and whatnot and getting everything all ready to go.


Here they are, ready to receive. One 5 gallon batch makes about 2 cases, or 50 beers. We finally have enough bottles from previous batches that we don't have to soak and remove labels anymore - which saves a lot of time, let me tell you. After you wash bottles out, you leave them in a sanitizing solution (I have my suspicions it's just oxyclean, but I'm not sure) for about 3 minutes. You don't have to rinse - just let them dry out some. Now you're ready to go!

In order to carbonate, you have to add one last blast of sugar for the yeast to eat up - yes, those bubbles are just yeast gas (tee hee!). There are a lot different ways to do this, and this batch we're trying out using dried malt extract (DME). We dissolved the DME in about equal parts water, and boil it for around 10 minutes, to make sure there's no bacteria hanging out in it. Then we gently added it into the beer. Now we're really ready to bottle.

We siphoned the beer out of the carboy, previous to this, and into the bottling bucket, which has a spigot. At this point, you just turn on your spigot and fill up the bottles - carefully. There are little things you can attach to you spigot that make it easier - they fill when touching the bottom of the bottle, then stop as soon as you remove the pressure. Ours broke a couple of batches ago, and it wasted a lot of beer, so we're sticking to our spigot.

After you fill, you cap. We have a handy dandy bottle capper to make this happen.
After placing a new cap on, you just place the capper over it, and press down with both handles. It takes a little oomph, but not too much. I think this is the fun part of bottling.

Well after 50, give or take, there you are - 2 cases of beer, made by your own little self. Sadly, we have to let these guys bottle age. If we drank them now, they wouldn't be fizzy and they might not taste as great as they will in 4-5 weeks. With cane sugar, you can usually drink after about 3 weeks, but DME takes a little longer. So, here they are, back in the coat closet, silently becoming delicious. Eat up, eat up, little yeasties.

Since there's usually a few sips that won't go into a bottle, we tested this out, and guys - it was good. It's always a pleasant surprise when it turns out the way you'd hoped. It tastes like wonderful, fresh, creamy Guinness - better than any I've had bottled or draft, in the U.S. or U.K. So, now we have another reason to be excited about Christmas Eve - we can celebrate by cracking open our own yummy Guinness!

Wednesday, November 19, 2008

Little Bird, Little Bird

After falling in love with the little stuffed bird ornaments in Last-Minute Patchwork + Quilted Gifts, I decided to make my own, winged version this year. And just like last year, I made these a gift to a great friend, so I couldn't write about them until she received them! I used coordinating fabrics for bodies and wings, so there are little birdie pairs.


I also made some simple stocking ornaments to go along with the birds, in matching fabrics.


They were very easy to make and I think they turned out sort of darling. And who doesn't love something with pretty ribbons attached?

I just found another great bird pattern today from Design Sponge via One Pretty Thing, so it looks like there may be some more birdies in my future!

Tuesday, November 18, 2008

Cheese, Glorious Cheese!

The time has come to talk of cheese, my friends. Cheese that you can make in your very own kitchen, as my friend K and I did this past Sunday. I know - it's pretty exciting, but scootch back off the edge of your seat - all will be revealed.


K had been longing to make cheese, and I was right there for her, wanting to make cheese, too. K purchased this amazing kit from Ricki the Cheese Queen, yes, you heard right, the Cheese Queen. It has everything you need to make 30 batches of mozzarella or ricotta.


Okay, so let's begin! We start, of course, with milk. Low-temperature pasteurized milk, whole or skimmed. We went with whole, cause, come on - fat makes everything more delicious. Apparently ultra-pasteurized milk won't work, because the heat denatures the proteins, and I can't imagine what you end up with, but I don't think it would be pretty. So, we begin with a gallon of milk, like this:
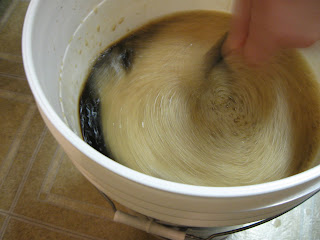
Prior to this, we added 1/4 tablet of rennet into 1/1 cup of water to let it dissolve. We also took 1 1/4 tsp. of citric acid and dissolved it into 1 cup of water. This citric acid solution was then added into the milk, and heated on the stove to 90 degrees. After reaching your temperature, you take the milk off the heat, and add the dissolved rennet, stirring up and down (for some mysterious reason). At that point, you leave the stuff alone for 5 minutes, to work its magic. After that time you get this:


This is curds and whey, people! Let's shudder briefly for Little Miss Muffet, who hopefully was eating cottage cheese. The milk solids, well, solidify into a sort of custardy texture, separating from the whey. Now it's time to cut the cheese! Well, okay, cut the curds...


This is K deftly cutting the curds in a sort of grid to gently break them up, so that they will be ready for the next step, reheating up to 105 degrees, being "slowly moved around," as the instructions told us to do.


After hitting the temperature and with additional stirring time, our curds began to sort come together more in the whey, and ended up looking like this...


Kind of groty, right? I'm not gonna lie to you, at this point, there is an unfortunate (but faint)baby spit-up odor in the mix, but the path to cheese is not without its perils...Well, okay, it really sort of is - it's miraculously easy. Next we drained off the whey - K making a lot of great whey puns all the while. We were shocked at the amount we were left with, momentarily convinced that we had created matter. Here's the curds separated from their pal, the whey.


Now comes a series of trips to the microwave for short periods of time, to heat and then separate more whey. Then comes the stretching, when K bravely handled the piping hot curds, stretching and unifying everything into something that looked like, and - hey - actually was cheese! Before the very end you add in a little salt or herbs or hell, whatever you want.


There it is! Mozzarella cheese! This first batch took maybe 45 minutes to an hour, and the second batch really took just a half-hour, as the directions said it would. Here's the glamour shot of the cheese, right before we sat down and put it to good use with the help of some crackers.

Isn't it pretty? It was damn tasty, too. In addition to cheese, we also used some of the whey for a pizza dough, and made what is darn close to a salted caramel ice cream. All in all, it was a very fulfilling day in the kitchen. As Ricki the Cheese queen says, it's just the beginning of our cheese adventure!

Sunday, November 16, 2008

Flowers, grown and made

Here's one of the last flowers of the season, scavenged during the great yard cut down a few weeks ago. I hated to discard anything still in bloom, so in they came for a few more days on the window sill. After clicking around, I think this flower is Tall Blue Pitcher Sage. I still have a ton of unidentified flowers in my yard, planted by the previous owners. Either way, this one was the winner for longest blooming - even with the crazy Indian summer we had.

But, since all flowers must eventually fade, I just finished a new project from the Alabama Stitch Book, by Natalie Chanin.

Here's a spankin' new, recycled t-shirt flower! This was a very simple project, and I love the results. You basically cut long, skinny strips of any old t-shirt, then make regular, vertical cuts into your strips, roll them together by twos, and sew up to secure. Combine about 5, and you get an everlasting chrysanthemum. Here's what the "baby" flowers look like, before coming together.

Once you stick these guys together, slap on a couple of felt leaves, there ya go! I'm finishing up my second one, and want to make one from a prettier color, for something brighter during the winter. I tell you, after sewing these together, I was definitely wishing I had a clue as to where my thimble was.
In other news, later today, I'm going to be making cheese with a friend - fresh mozzarella. I'm pretty excited to see how it all rolls out. I'll let you know how it all goes!

Wednesday, November 12, 2008

Guinness Part 2

Okay, so after boiling up the wort, it has to cool down to around 72 degrees. This can take a while if you're stuck with the bathtub full of cold water method, as we are. In the warmer months, it's just about as long as it takes to go the movies, conveniently enough. Once your wort is cool, it's time to strain out the hops and any other lumpy things, and get it set up in the "ale pail" or fermentation bucket.


You can sort of see the hops there - they look like big oatmeal grains. After this is done, it's time to pitch the yeast, i.e. throw the yeast in. During this whole process, we've been letting the yeast packet start, so that the yeast are all fired up and ready to go. You can see how big the originally flat packet has gotten.


So, without much ado, it gets dumped in, then we aerate...or, well, just stir it up a lot, to make sure there's enough oxygen for the yeast.


After it's all shook up, as it were, it's time to add more water - until you hit the 5 gallon mark on the ole bucket. Some people say you spring water, but others say tap is just fine - that all the "stuff" in tap water lets the flavors cling to something. Adding in the water is another great chance to incorporate more air into the mix. After that, you slap on the air tight lid, put your airlock in the hole, and just let 'er go. Fermentation has begun, so it has to be kept between 68-72 degrees, and out of bright light, so our bucket is living in the coat closet this time. Here's a shot of the airlock bubbling away the next day.


The main fermentation doesn't have to take that long - ours seemed tapped out after just 2-3 days. At this point, we "rack it," or syphon it out of the first fermentation bucket into the glass carboy, to let it keep fermenting away from the sediment.


And here's how she is right now, looking very dark and delicious. It'll spend another two weeks in this second fermentation, then we'll be ready to prime and bottle. Priming is adding one last additional shot of sugar to allow for the carbonation. Factory beer is pasteurized, to kill all the yeast (cause it'll make ya sick), so the beer we buy is force carbonated in order to be bubbly. This batch we're going to try priming with some of the powdered malt, instead of corn sugar. Hopefully we'll get a better, less sweet taste than in the past. I'll make sure to post about the bottling process in a few weeks. A five gallon batch usually yields about 50 bottles, or 2 cases. It's fun, but veeerrry messy.


As a parting shot, here's what the spent hops look like:

Tuesday, November 11, 2008

My Goodness, My Guinness!

This weekend, we furthered our adventures in home brewing by starting our fourth batch, a Guinness Draught clone. We didn't know what we wanted to make when we went into the shop, but then flipped open to the recipe in the Best of Brew Your Own magazine's 150 Classic Clone Recipes issue. So, here's how it went down! (these pics aren't exactly pretty, so brace yourself)


Like any beer, we start with the grains. What you see above are flaked barley and roasted barley. These are what give the beer its flavor, and with each different combination of grains you use, a different flavor can be developed. There's a lot more to it than that, of course, but grain is a starting point!


Here we have our grain all bagged up in cheese cloth, and ready to go. This is how you start your wort (which apparently is pronounced wert ). The grains are steeping in 160 degree water, for varying times, depending on your recipe.


Here's the wort, cooking away, releasing all the sugars and flavors from the grains. This recipe is actually a partial mash. Usually you'd make your wort all in your big brew pot, but for reasons not entirely clear to me, this is a bit different, and starts with a smaller amount of water at first. Like my crazy harvest yellow stove...and, um, crazy green walls?

The next step for this particular recipe was sparging, which just means taking your grains out of the wort and into a colander over your bigger brew pot, which is full of water. You then pour the wort over the grains, to get every last bit of sugar into the clean water in your pot. In my mind this is like adding water to a concentrate, but I'm not sure if that's entirely accurate...I'm more of a "relax, have a home brew" kind of gal, than a crazy, measure measure test test one. Anyway, here's what sparging looked like: messy.


Next we added in the malt - which is yet another grain/sugar component. Leaving it at that, we'll just say it lends flavor and give the yeast even more sugar to chow on. This recipe used an dried and an extract malt. The dried stuff looks like powdered milk, and can be very hard to stir in. It clumps and looks alarming, but if you just keep stirring, it all takes care of itself. After malting, you boil boil, and add in you hops.


Aaaahhh, hops. T threw them in before I could get a picture, but these Kent Golding hops were mushed into big pellets. They look like giant rabbit food, but smell like spicy, peppery, bitter green goodness. I tried chewing some loose hops before, and whew, it is bitter. Hops are exactly that element in beer - the bitterness. when you add them into the wort, they tend to make things, well, active. And when you throw them all in at once, they tend to make your pot boil over...like ours did. Doh! Well, all was not lost, and here's what it all looks like, boiling away. Murky, eh? You can see the hops on the left of the picture, sort of.


Okay, I think there's going to have to be a part 2 to this process! Next post: pitching the yeast, aerating and letting her go!

Saturday, November 8, 2008

Five Most Influential Books...


A friend was pondering the most influential reads of her life so far, and it got me thinking, too. Just like her, I feel the need to divide between adult and kid titles, since I'd have five kids books before I even got to the adult years.

Adult Titles:

1. Daisy Fay and the Miracle Man by Fanny Flag

2. The Bell Jar by Sylvia Plath

3. One of Ours by Willa Cather

4. The Art Lover by Carol Maso

5. The English Patient by Michael Ondaatje


Childrens' Titles:

1.The Little House series by Laura Ingalls Wilder ( I can't choose just one)

2. The Anne of Green Gables books by Lucy Maud Montgomery (again, can't pick just one)

3. Misty of Chicoteague by Margeurite Henry

4. The Snowy Day by Ezra Jack Keats

5. If You Listen by Charlotte Zolotow (with the old artwork)


These are almost just a snapshot of what I'm feeling this particular day. Who can say what I might list next week, or next year? I suppose I'd call these influential in that they either stuck with me and made a deep impression upon me my whole life, or in that they showed me something new or showed me a way in which I did fit into the world.

Here's the set of Laura Ingalls Wilder books me and my sisters shared since, well, birth, I think. They are clearly well loved, and opening them - despite broken spines and very yellowed pages - is in every way like coming home. God, I love books, don't you?


Sunday, November 2, 2008

What a Beautiful Afternoon...

Despite the fact this is the first day of "falling back" and less daylight, it was a gorgeous afternoon. It's unseasonably warm, so I was able to spend a little time outside today, and the transition to super-depressing-winter-time was a little easier to take.


I just love this time of day, when the shadows get long in the back yard and the sky is all orange and bright. There's something very comforting about it to me. It's the end of the day light - the light of everyone coming home, the light of dinner time and everything being right in the world.

So, in-between cleaning out the fridge (so satisfying) and loads of laundry, I squeezed in some fresh bread and a pot of from scratch chicken noodle soup. There were all kinds of yummy smells going on in the house. Add in the smell of clean laundry, and I'm a very happy lady.


This was my first pot of chicken soup from home made stock, and even though it's a multi-step process, it's totally worth it. T made game hens earlier in the week ( I know, game hens?) and we had a whole one left over. I used the bones for stock a couple of days before, which was super easy, then today, added in the left over hen, some potatoes and the delicious noodles, and that's it! Not counting picking bones out of the stock and stripping the meat from the bird, it was practically effortless. What could be more delicious than bread and soup?


A beautiful end to the day. Now, if only this season of Mad Men wasn't over, things would be just about perfect :)